Skip to content
Wagtail Wagtail + CodeRed Extensions
  • Getting Started
    • Installation
    • Customize the design of your website
    • About The Tutorial
    • Tutorial Part 1: Site Name, Logo, and Global Colors
    • Tutorial Part 2: Adding Pages
    • Tutorial Part 3: Adding Content, Custom CSS
    • Tutorial Part 4: Navbar & Footer
    • Tutorial Part 5: Creating a Blog
    • Tutorial Part 6: Web Page and Google Map
    • Tutorial Part 7: Create Categories with Classifiers
    • Tutorial Part 8: Forms & Contact Pages
    • Tutorial Part 9: SEO Metadata
    • Tutorial Part 10: Images
    • Tutorial Part 11: Password-Protected Pages
  • Advanced Tutorial
    • Customizing Templates & CSS
    • Custom Page Types
  • Features
    • Content Blocks
      • Accordion Block
      • Button Block
      • Card Block
      • Carousel Block
      • Download Block
      • Embed Media Block
      • Film Strip Block
      • Google Map Block
      • HTML Block
      • Image Block
      • Image Gallery Block
      • Image Link
      • Latest Pages Block
      • Modal Block
      • Page Preview Block
      • Price List Block
      • Quote Block
      • Reusable Content Block
      • Table Block
      • Text Block
    • Layout Blocks
      • Card Grid Block
      • Column Block
      • Hero Block
      • Responsive Grid Row Block
      • HTML Block
    • Page Types
      • Article Pages
      • Event Pages
      • Form Pages
      • Location Pages
      • Stream Forms
      • Web Pages
    • Snippets
      • Accordions
      • Carousels
      • Classifiers
      • Content Walls
      • Film Strip
      • Footers
      • Navigation Bars
      • Reusable Content
    • Related Pages
    • Searching
    • Spam Protection
    • Import Pages
    • Mailchimp Integration
  • How-To Guides
    • Best Practices for Images
    • Customize Navbar and Footer
    • Add Tracking Scripts
    • Open External Links in New Tab
    • Translation & Multi-Language Support
    • Run Wagtail CRX with Docker
    • Using a Custom Image Model in Wagtail CRX
    • Convert Existing Site to Use a Custom Image Model
  • Technical Reference
    • Wagtail CRX Django Settings
  • Contributing
  • Deploying & hosting
  • Release Notes
    • v5.0.1 release notes
    • v5.0.0 release notes
    • v4.1.1 release notes
    • v4.1.0 release notes
    • v4.0.1 release notes
    • v4.0.0 release notes
    • v3.0.4 release notes
    • v3.0.3 release notes
    • v3.0.2 release notes
    • v3.0.1 release notes
    • v3.0.0 release notes
    • v2.1.4 release notes
    • v2.1.3 release notes
    • v2.1.2 release notes
    • v2.1.1 release notes
    • v2.1.0 release notes
    • v2.0.0 release notes
    • v1.0.3 release notes
    • v1.0.2 release notes
    • v1.0.1 release notes
    • v1.0.0 release notes
    • v0.25.2 release notes
    • v0.25.1 release notes
    • v0.25.0 release notes
    • v0.24.1 release notes
    • v0.24.0 release notes
    • v0.23.1 release notes
    • v0.23.0 release notes
    • v0.22.3 release notes
    • v0.22.2 release notes
    • v0.22.1 release notes
    • v0.22.0 release notes
    • v0.21.1 release notes
    • v0.21.0 release notes
    • v0.20.0 release notes
    • v0.19.1 release notes
    • v0.19.0 release notes
    • v0.18.2 release notes
    • v0.18.1 release notes
    • v0.18.0 release notes
    • v0.17.0 release notes
    • v0.16.3 release notes
    • v0.16.2 release notes
    • v0.16.1 release notes
    • v0.16.0 release notes
    • v0.15.2 release notes
    • v0.15.1 release notes
    • v0.15.0 release notes
    • v0.14.1 release notes
    • v0.14.0 release notes
    • v0.13.3 release notes
    • v0.13.2 release notes
    • v0.13.1 release notes
    • v0.13.0 release notes
    • v0.12.1 release notes
    • v0.12.0 release notes
    • v0.11.0 release notes
    • v0.10.0 release notes
    • v0.9.1 release notes
    • v0.9.0 release notes
Wagtail Hosting by CodeRed
  1. Docs
  2. Features
  3. Content Blocks
  4. Carousel Block
Edit on GitHub View source

Carousel Block

Allows the user to create a carousel with image backgrounds and relevant blocks. Carousels automatically change slides, but also have arrow controls for the user to advance or return to the previous slide. Make a Carousel by going to Snippets > Carousels and clicking Add Carousel.

Example:
default button styles

default button styles

Field Reference

Fields and purposes:

  • Carousel - Choose a Carousel

If you don’t have any carousels already made, you can build a carousel by clicking Choose A Carousel and clicking on “Why not create one now?” in the popup box. This will take you to Snippets > Carousels where you can create a carousel to add to the page. Here is a carousel editor with three slides; each slide has a caption:

Building a carousel in Snippets

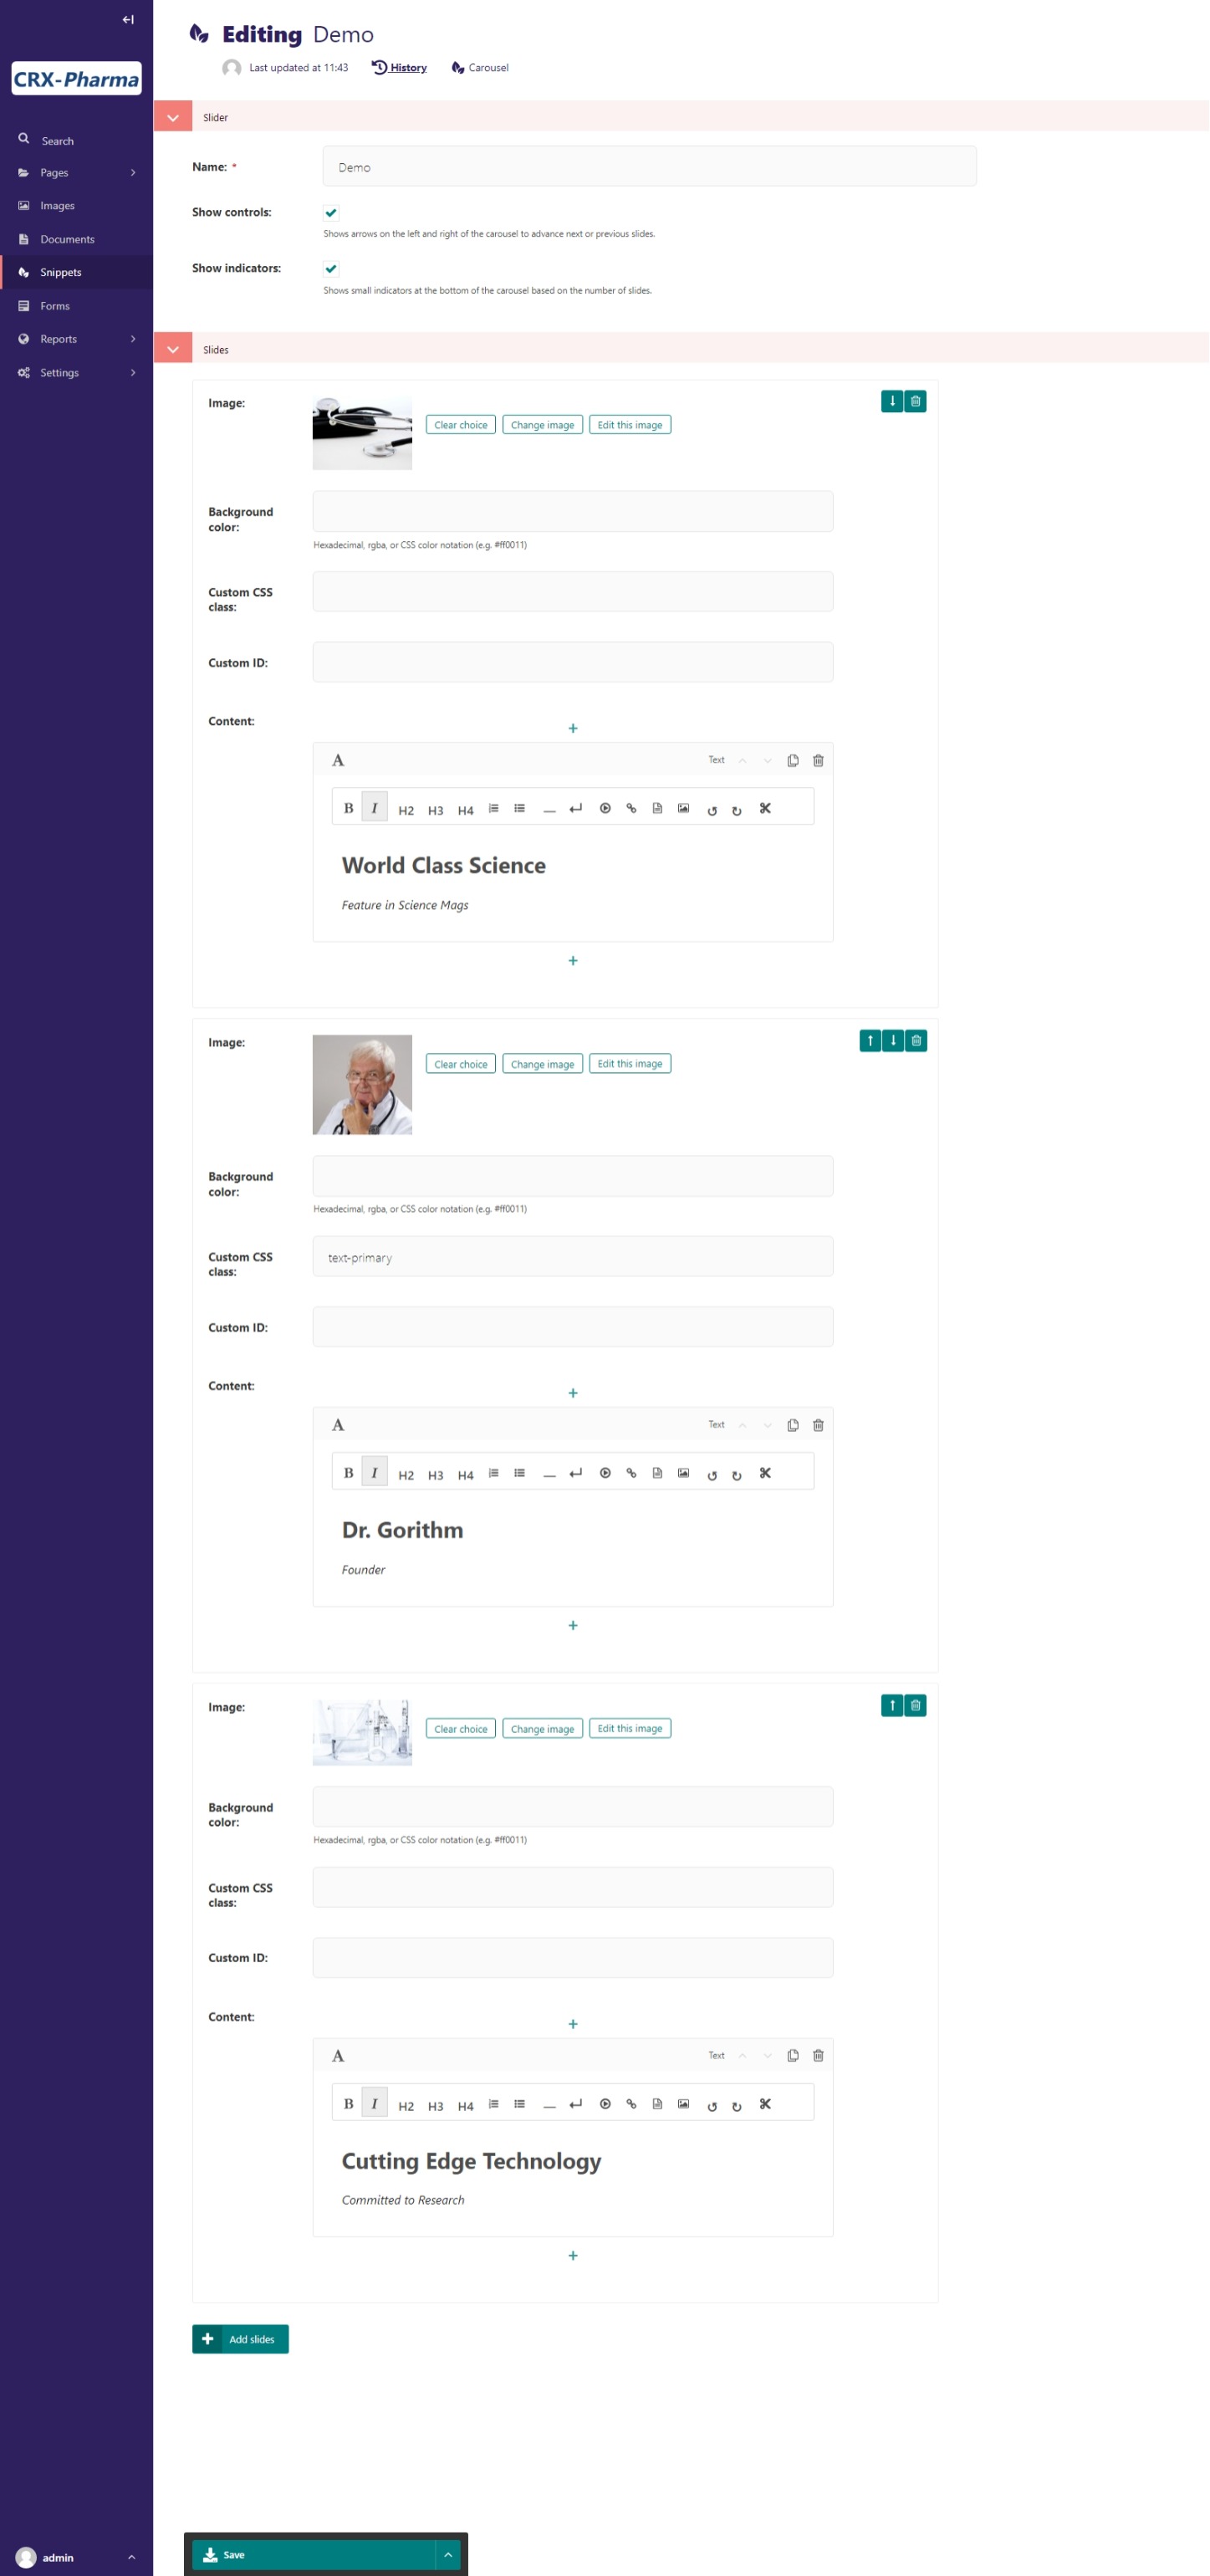
The edit mode for building a carousel snippet

Save your work and now you can select that carousel in a page editor. This one is named Demo. Here is a preview of for one of our slides:

Our carousel published on the page

The carousel published on a page

You’ll notice it’s hard to see the caption because the bootstrap default text is white. Let’s look at customizing our carousel two different ways.

First, you can override the CSS class. If you look at the bootstrap docs or the template. You’ll find the class for caption is carousel-caption. For our example, let’s add a background-color and border-radius.

.carousel-caption{
    background-color: rgba(60, 60, 60, 0.5);
    border-radius: 10px;
}

Add this to your custom.css file (basic installation) or the custom.scss file (sass installation). Save the file, compile the sass(sass install only), and hard refresh the browser. See Adding Custom CSS for more details.

Our carousel published on the page

The carousel published on a page

The second option would be to alter the template. Looking at the bootstrap docs you can find there is a dark variant. See Customizing Templates & CSS for a more detailed tutorial on overriding templates.

  • To alter our template you need to copy the template from github

  • Paste the file in the correct directory so it overrides the default template. Our file path: mysite>website>templates>coderedcms>blocks>carousel_block.html

  • In carousel_block.html on line 4; add carousel-dark to the class attribute. The line should now look like this:

<div id="carousel-{{self.carousel.id}}" class="carousel carousel-dark slide" data-bs-ride="carousel">
  • Save the file and refresh the browser.

Our carousel published on the page

The carousel published on a page

(In this example, I removed the custom css for .carousel-caption from the previous example)

← Card Block Download Block  →

Page contents

  • Carousel Block
    • Field Reference
  • Wagtail Hosting by CodeRed
  • Wagtail CRX on GitHub
  • About CodeRed
© Copyright 2018–2025, CodeRed LLC
Created using Sphinx Wagtail Theme 6.5.0 and Sphinx 8.2.3